Spooge Tank Rust and Paint Removal
Faced with having to prep and paint two heater boxes, plus dozens of smaller parts, I cobbled together an electrolytic process to remove rust and paint using a battery charger, a scrap steel plate, and a bath of washing soda.
The Chemical Process
A carbon steel plate is immersed in a conductive solution of sodium carbonate and water. This plate is connected to a positive DC voltage. It becomes an anode. The rusted part is connected to the negative/ground of the DC supply, and is immersed in the solution. It becomes a cathode. When the energized, rust and paint migrate from the cathode to the anode.
Sodium carbonate is also known as washing soda or soda ash, and may be available in quantity through janitorial suppliers. I purchased 2kg from Amazon for around $10.
Here is one straightforward explanation
http://www.secondchancegarage.com/public/electrolytic-rust-removal.cfm
An interesting discussion here also. I'm no chemist, however some Studebaker afficionados seem to be.
Equipment
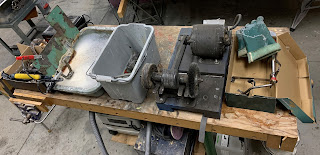
This is a crude, jury-rigged arrangement, however it worked well enough.
The bench is covered with scrap plywood, (too late) and the parts are in an in-box for rusty parts at one end, followed by the tank, a bucket for drip-drying, a wire wheel on an arbour for cleanup, and an out-box to accumulate the stripped pieces. You can see the battery charger behind the in-box. The ugly steel plate clamped to the tank is scrap I had lying around. This is not ideal, but it worked, and is safely clamped to one side of the plastic tank. The positive lead of the battery charger is clipped to the steel plate, the negative is attached to the part when it is immersed. I did this via a spring clamp as I did not want to immerse the battery charger's clips.
If warranted, I'll make some dedicated components for this. A bucket or tank with a snap-on lid for the solution would be ideal, (it can be reused indefinitely) and a mild steel anode plate fitted to that container would be perfect. Connections to my stick welder would complete the setup..
The Workflow
- The steel spring clamp is attached to the the part, ensuring conductivity.
- The part is immersed in the bath, placed as close to the steel plate as possible.
- The negative clip from the battery charger is attached to the spring clamp.
- The circuit is energized.
- After sufficient time has passed, the part is removed and dropped in the bucket, allowed to dry, and cleaned up with the wire wheel.
- Parts are washed with detergent and water and dried, then primed and painted.


Comments
Post a Comment